Getting Started With Your T650p
Learn how to set up your new Verifone Android T650p EFTPOS terminal
Download the Quick Start Guide (PDF)
Watch: How to set up your T650p
This video will walk you through everything you need to get started, including:
-
Powering on and charging
-
Connecting to the internet (SIM, Wi-Fi, or Ethernet)
-
Using your terminal with or without a base
-
Changing the paper roll
What’s in the box?
Depending on your setup, you may receive:
-
Verifone T650p EFTPOS terminal
-
USB charging cable and wall adapter
-
Charging base or Full Feature base (optional)
-
Paper roll
1. Power on your terminal
Your terminal comes charged and ready to use.
-
Press and hold the Power button on the left side of the terminal until the screen lights up.
-
If using a base, placing the terminal on it will also power it on.
To restart or power off: hold the Power button for 1 second, then tap Power off or Restart.
2. Charging your terminal
You can charge your T650p using either the included USB-C cable or an optional base
USB-C charging (standard)
-
Plug the USB cable into the wall adapter
-
Connect the USB-C end to the port on the side of the terminal
-
Look for the charging icon 🔋 on the screen
Charging base (optional)
-
Plug the USB-C cable into the wall adapter
-
Plug the adapter into a power socket
-
Connect the USB-C end to the port on the underside of the charging base
-
Place your terminal on the base to begin charging
 Full Feature Base
-
Plug the power adapter into the wall socket
-
Connect the cable to the round power port on the back of the base
-
Place your terminal on the base — it will begin charging automatically

NOTE: Charging bases are optional. If your setup requires one, contact us.
3. Connect to the internet
Using a SIM card
If your terminal includes an active SIM card, it will connect to the internet automatically.
Using Wi-Fi
-
Swipe down from the top of the screen
-
Tap and hold the Wi-Fi icon
-
Select your network and enter the password
-
Press the Home button to return to the Payment screen
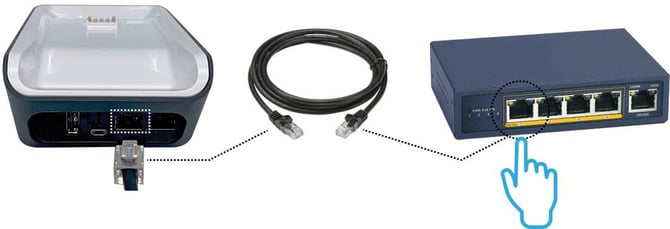
Using Ethernet via base

-
Connect the Ethernet cable to the base (port labelled with a network icon)
-
Plug the other end into your router’s LAN port
-
The terminal connects to the base via Bluetooth, so it does not need to remain docked
4. Replace the paper roll
-
Open the printer lid using the tabs on the side
-
Remove the empty roll
-
Insert a new roll with the paper feeding from the top
-
Leave a short length exposed, then press the lid closed until it clicks
Order paper rolls online: eftpos.co.nz/rolls. Use code WELCOME at checkout and get free shipping on your first order.
5. Passcodes
Certain terminal functions (e.g. refunds) require a passcode. To set or reset a passcode, call 0800 EFTPOS (0800 338 767, option 2). You must be the listed authority on the account to make changes.
More help to get started
Explore these guides to help you get the most out of your T650p:
-
Charging your terminal
Learn how to troubleshoot charging issues, and keep your device powered throughout the day. -
Viewing transaction reports
Step-by-step instructions for accessing and understanding your daily and historical transaction reports. -
Settlement
Settlement refers to the process of transferring funds from a customer's bank account to a merchant's account after a transaction has been completed. Learn how to check your settlement total and access settlement reports on your terminal.

