To Enable Pre Auths: Call Customer Service on 0800 338 767 (option 3) for more information.
Navigation
- Open a Pre-Auth
- Finding An Open Pre-Auth
- Confirm you have the correct Pre-Auth
- Complete a Pre-Auth
- Increment - increase the Pre-Auth amount of an open Pre-Auth
- Cancel a Pre-Auth
- Delayed Charge - can be applied to a completed Pre-Auth within 90 days of
completion. - Account Verify - confirm a card is valid with a $0 Pre-Auth
Open a Pre-Auth
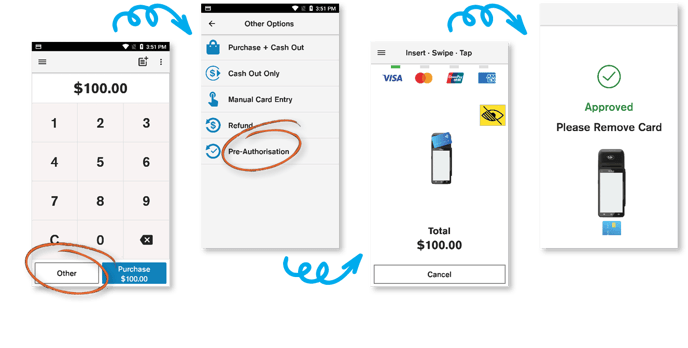
- Enter the Pre-Auth amount on the payment screen and tap Other
Note: You can only complete a Pre-Auth for up to 15% more than the original
amount - Tap Pre-Authorisation
- If the customer is present, they will present their card
- If customer is not present, tap the hamburger menu for Manual Card Entry
- The terminal will process the Pre-Auth and display either Approved or Declined
NOTE: Pre-Authorisation transactions are valid for 30 days. If you need to extend the pre-auth, you can do another pre-auth after 30 days.
Finding An Open Pre-Auth
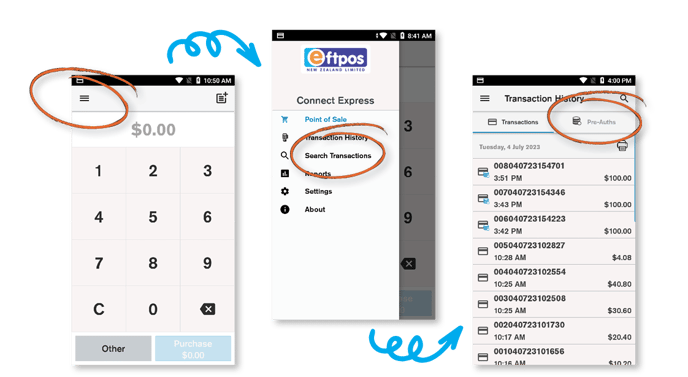
- From the Payment screen, tap the hamburger menu

- Tap Transaction History
- Navigate to the Pre-Auths tab
NOTE: Your Pre-Auths are sorted by date and time. To complete, cancel, or perform other actions on a Pre-Auth, simply select the transaction from the list.
The icon next to your Pre-Auth transactions changes depending on the status of the transaction:
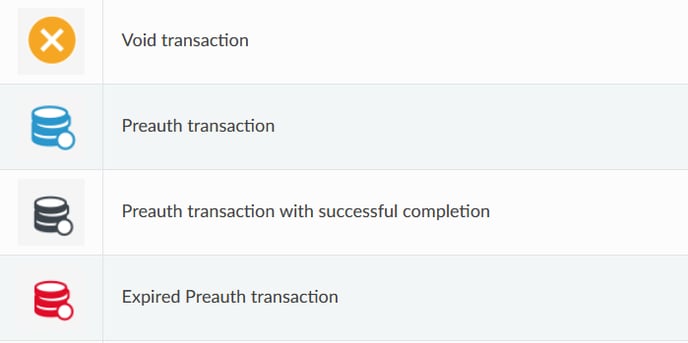
NOTE: The Void transaction icon is shown next to cancelled Pre-Auths
To find a specific Pre-Auth:
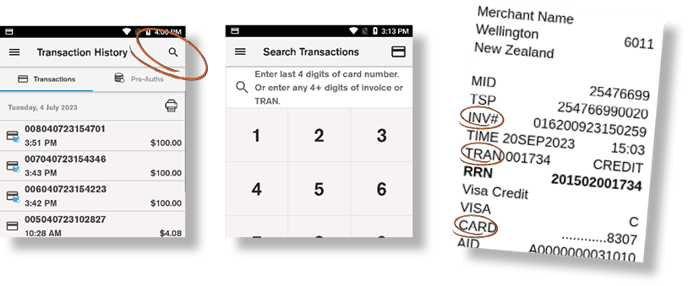
You can find all Pre-Auths opened on a terminal by filtering and searching in the terminal's Transaction History:
- From the Payment screen, tap the hamburger menu
- Tap Transaction History
- Tap the Search icon

- Enter the last four digits of the customer’s card number or any 4 or more digits
from the TRAN number or Invoice Number - Tap View
To search for a specific Pre-Auth opened on another terminal:
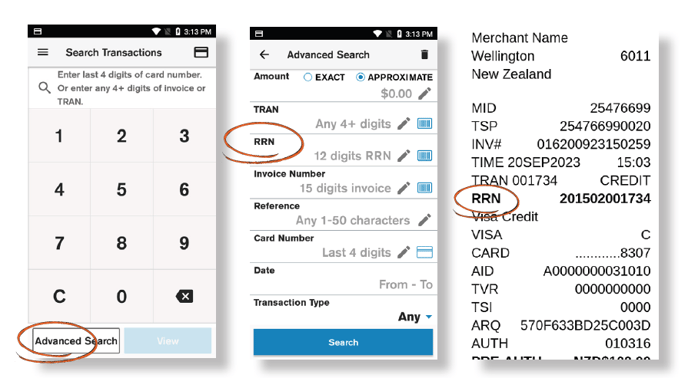
- From the Payment screen, tap the hamburger menu
- Tap Search Transactions
- Tap Advanced Search
- Enter the 12-digit RRN from the Pre-Auth receipt into the RRN field
- Select Pre-Auth from the Transaction Type drop-down menu
- Tap Search
Download all Pre-Auths across your terminals:
Pre-Auth Report can be used to retrieve a list of open Pre-Auths opened on the terminal, or on all of your terminals. You can also filter by expiry date to see which Pre-Auths are expiring soon:
- From the Payment screen, tap the hamburger menu
- Tap Reports
- Select Pre-Auth Report
- Select By Merchant to view all open Pre-Auths on all terminals associated with the merchant number loaded on the terminal. Select By Terminal to view all open Pre-Auths on that terminal only.
- You can also filter your open Pre-Auths based on expiry date
- Tap Search
Confirm you have the correct Pre-Auth
Check the following to ensure you have the correct Pre-Auth before processing a completion, increment, delayed charge or cancelling a Pre-Auth.
- Date and time of the transaction
- Transaction amount
- Last 4 digits of the card
- RRN (Retrieval Reference Number)
Complete a Pre-Auth
- Select the Pre-Auth transaction from your Transaction History
- Confirm you have the correct Pre-Auth
- Tap COMPLETE
- Select Same Amount to charge the customer the original Pre-Auth amount or
select New Amount if you need to enter a different amount - Tap Submit to process the Completion
Increment
To complete an open Pre-Auth for more than 15% of the original amount, you must
perform an Increment:
- Select the Pre-Auth transaction from your Transaction History
- Confirm you have the correct Pre-Auth
- Tap INCREMENT
- Tap the New Amount field to edit the Pre-Auth amount
- Enter the new total Pre-Auth Amount and tap Enter to confirm the new
amount - Tap Submit to process the Increment
NOTE: Increments are available for Visa and Mastercard cards only, and
they can only be performed on an open Pre-Auth. There is no limit to the number of Increments that can be performed on an open Pre-Auth. Please note that for Mastercard pre-auths the 30 day pre-auth limit resets, however for Visa cards it does not.
Cancel a Pre-Auth
- Select the Pre-Auth transaction from your Transaction History
- Confirm you have the correct Pre-Auth
- Tap CANCEL
- Select a Reason
- Tap Submit to Cancel the Pre-Auth
NOTE: Pre-Auth Cancel is not available for AMEX. If a Pre-Auth processed using an AMEX is not completed within 7 days, it will automatically drop off the cardholder’s account.
Delayed Charge
A Delayed Charge can be applied to a completed Pre-Auth within 90 days of
completion. It can be used in situations where additional goods or services were
provided after the initial Completion. For example, for items consumed from a hotel
mini-bar or for parking and speeding fines associated with a rental car. There is no limit to the number of Delayed Charges that can be performed on a completed Pre-Auth
- Select the Pre-Auth transaction from your Transaction History
- Confirm you have the correct Pre-Auth
- Tap DELAYED CHARGE
- Enter the Delayed Charge amount
- Tap Enter to confirm the amount
- Tap Submit to process the Delayed Charge
NOTE: Delayed Charge is only available for ANZ merchants, and only available for Visa and Mastercard cards. Some transactions may be exempt from Delayed Charges. Refer to ANZ merchant services for more information.
Account Verify
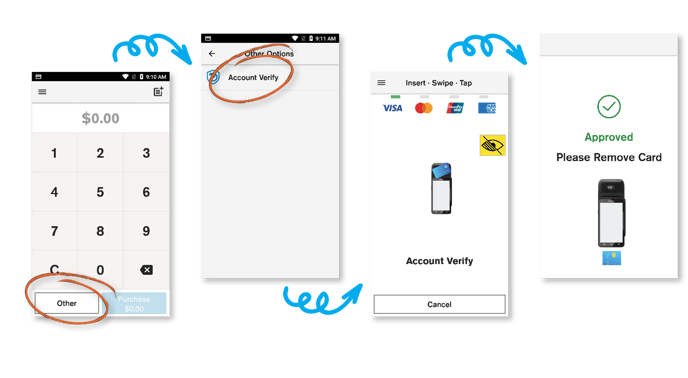
To perform an Account Verify, which confirms the validity of a credit card without
holding funds or making a charge:
- Tap Other on the payment screen, ensure no amount is entered
- Select Account Verify
- The customer can then present their card, or you can tap the hamburger menu
for Manual Card Entry - Terminal will show Approved if card is valid