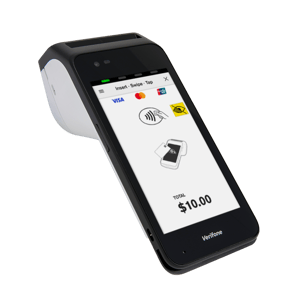
Learn how to set up your new Verifone Android Carbon Mobile 5 EFTPOS terminal
Get started with your Carbon Mobile 5 with Printer in three easy steps:
1. Power on your device
Your terminal will come charged and ready to use. Press and hold the Power button on the right side of the terminal to power it on or set up your charging base and place the terminal on the base to power it on.
Your terminal will start up and load the Payment screen. If your terminal connects via mobile data with a SIM, you’re good to go! If not, you'll need to connect to Wi-Fi.
NOTE: To power off or restart your terminal, press and hold the Power button for 1 second and then tap Power off or Restart. You will need to remove the terminal from the base first, if you have one, to turn it off.
2. Connect to Wi-Fi
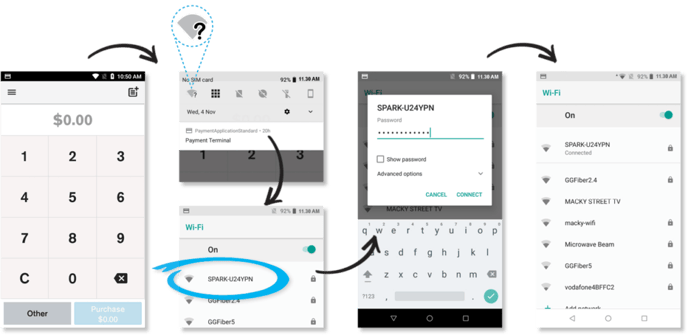
- Swipe down from the Notification bar at the top of the screen and tap and hold the Wi-Fi icon
- Select your network from the available networks list
- Enter your Wi-Fi password and tap CONNECT
- Press the
 button in the bottom Navigation bar to navigate back to the Payment screen
We recommend you set your passcodes up when you first get your terminal, so you’re ready to process a refund when you need to.
To set up your passcodes, call our Technical Helpdesk on 0800 338 767 and they will guide you through setting up a six-digit manager passcode and a four-digit cashier passcode.
.
Your device
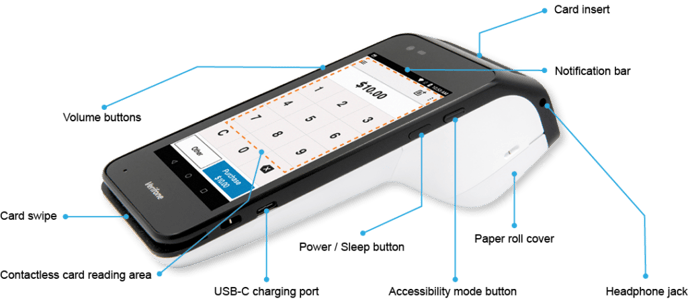
NOTE: Your new terminal is slightly different to terminals you might already be familiar with. The terminal has a virtual keypad instead of physical keys and your customers will swipe their cards at the bottom of the terminal and insert chip cards into the top of the terminal.
- Card swipe – This is where your customers swipe magstripe cards.
- Volume buttons – Adjust the volume of sounds and alerts.
- Power button – Power your terminal off and on and wake your terminal from sleep mode.
- Card insert – Chip card slot.
- Notification bar – See alerts, battery level, connectivity status and more in the bar at the top of the screen. Swipe down from the Notification bar to view the Quick Settings panel.
- Contactless card reading area – Customers paying by contactless can tap anywhere on the screen to make payment.
- USB-C charging port – Port for a USB-C charging cable.
- Accessibility mode button – Pressing the dimple button on the side of the terminal for 1 second at the Present Card screen will enable Accessibility mode.
- Paper roll cover - This is where you insert EFTPOS paper rolls for receipt printing
- Headphone jack - Customers can use headphones to heart prompts and alerts if they wish
NOTE: See the Safety and Handling guide to ensure your terminal is set up and used correctly and safely.